When I started to build the blog extension https://github.com/dankhrapiyush/blog for PWA Studio I followed this guide https://reactjs.org/docs/thinking-in-react.html that helped me out.
Here is a list of my steps that I am following for a PWA Studio extension:
- Step 1: Draw a Rough Mockup
- Step 2: Break The UI Into A Component Hierarchy Structure
- Step 3: Start With A Minimal Version of the extension in PWA Studio
- Step 4: Identify Talons and Util Of the extension
Let’s take an example of the blog extension and understand this.
Step 1: Draw a Rough Mockup
First of all, the first step is to draw a rough mockup. Drawing a mockup is like taking a break and playing with some sketch arts.
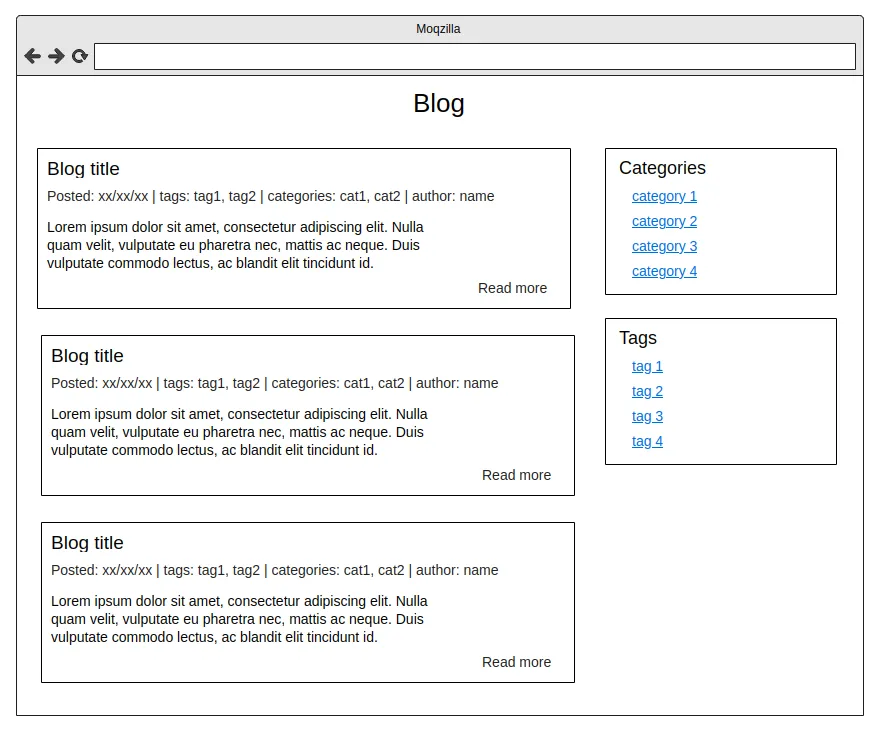
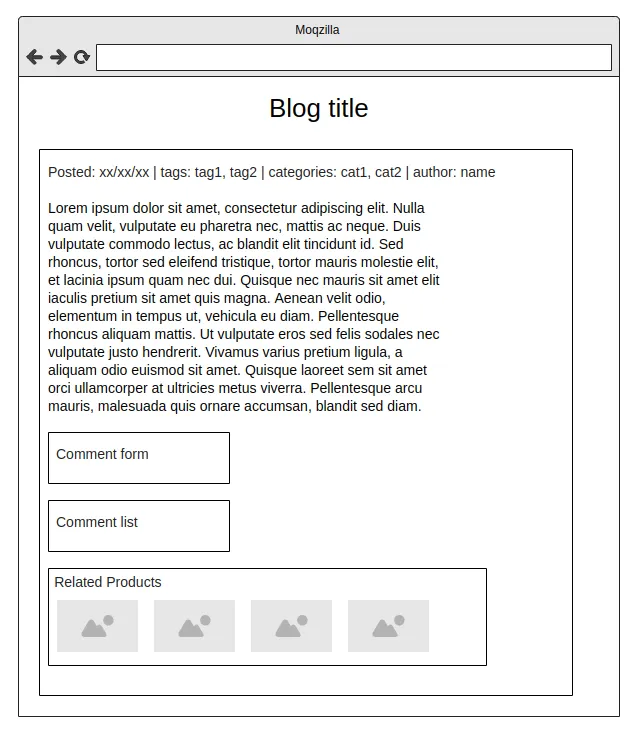
Here is a couple of mockups of the blog extension:
-
Blog list page
-
Blog view page
This step could be optional. If you are not developing a new feature and doing some enhancement, then it does not require you to create it. But this is useful for planning components that we will do in the next step based on this UI.
Step 2: Break The UI Into A Component Hierarchy Structure
Break the UI into components. Start planning the structure of components that could be divided into main components like:
Blogs: for a blog list pageBlog: for a blog view pageBlogComment: to add a comment on the blog pageCategory: for a blog list page of the categoryTag: for a blog list page for the tag
Furthermore, these components can be divided into sub-components like:
Blogs
BlogsContent: to display a list of blogsSidebarCategories: to show a category list on the sidebarSidebarTags: to show a tag list on the sidebar
Blog
BlogContent: to display the blog contentRelatedProducts: to show a list of related products underneath the blog
BlogComment
CommentContent: to show a list of commentsCommentForm: to show a form to submit the comment
Likewise, we can prepare an overall structure of the extension.
Step 3: Start With A Minimal Version of the extension in PWA Studio
After creating a structure, we can start the implementation of the extension. In that, the best way is to start from the top-level component.
For example, in the Blogs component, we write a GraphQL query to fetch a blog list and then pass it to the BlogsContent component.
In the BlogsContent, we iterate the data array and render a list of blogs that includes the blog’s author, categories, tags, creation time, content and “read more” link.
After that, in a sidebar, it includes two components SidebarCategories and SidebarTags that list out active categories and tags. Under the SidebarCategories component, we write a GraphQL query that fetches data to list out the category’s title, link and number of posts.
Step 4: Identify Talons and Util Of the extension
This step 4 is coupled with Step 3. While implementing the component, we identify which talons and util functions should be required that we can move to the talons and util directory to keep the directory structure neat and clean.
For example, to show a formatted date under the blog list and view page, we should write that function under the util directory and use it everywhere.
PWA Studio has some util functions under packages/peregrine/lib/util that we can utilize if needed.
This is the same approach for talons packages/peregrine/lib/talons as well.
So, here I have shared my experience that I’m following for creating an extension. This workflow could be different for you, as I believe it depends on the nature of your coding style and strategy. It may need some back and forth between steps during actual implementation.
Basically, if we don’t do proper planning and directly jump into coding, then after completing some part of the extension, you will realize that you are stranded in a messy code and data flow. This is my experience.
I hope it could be helpful to you and thank you for reading.
Cheers!